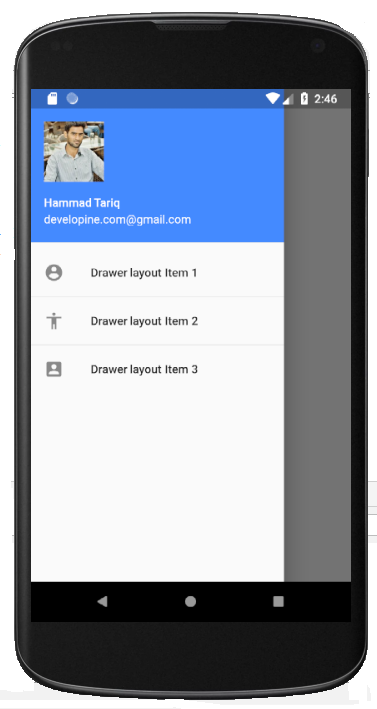
In this tutorial you will learn how to add Navigation Drawer Layout in your Flutter App.
You will learn how to add Left Navigation Drawer ( Drawer which opens from start side or right side ) and right Navigation Drawer (Drawer layout which slides from end or left side of the screen).
We will be using following Widgets to add Drawer layout in our Flutter App:
Scaffold is used to implement Drawer, Snackbar, App Bar, Bottom Sheet, Bottom Navigation Bar and Floating Action Button.
So to add Navigation Drawer in our Flutter App we are required to add Scaffold Widget first.
Than our Drawer Widget will become children of Scaffold Widget (We will add drawer inside Scaffold).
Scaffold Widget has 2 properties for Drawer layouts in Flutter.
Scaffold(

  drawer:  // Here we will add Drawer Layout.

);
Scaffold(

  drawer:  Drawer (
  child:  // here we will add Drawer layout items in next step.
),
);
Here we will add ListView Widget as children of Drawer Widget.
We are adding ListView here so user can scroll drawer items vertically.
ListView Widget requires array of Wdgets as ListView items.
Scaffold(
  drawer: Drawer(
      elevation: 20.0,
      child: ListView(
        padding: EdgeInsets.zero,
        children: <Widget>[


        ],
      )),
)
At this step we are going to add first item in ListView which will be Drawer Header Layout.
For this purpose we have added UserAccountsDrawerHeader Widget.
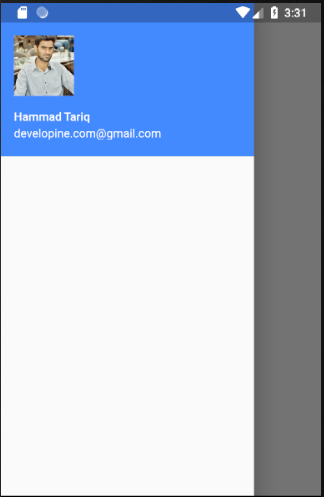
We can add user name, user email and user profile picture in our Drawer header.
Scaffold(
  drawer: Drawer(
      elevation: 20.0,
      child: ListView(
        padding: EdgeInsets.zero,
        children: <Widget>[
          UserAccountsDrawerHeader(
            accountName: Text('Hammad Tariq'),
            accountEmail: Text('[email protected]'),
            currentAccountPicture:
            Image.network('https://hammad-tariq.com/img/profile.png'),
            decoration: BoxDecoration(color: Colors.blueAccent),
          ),
        ],
      )),
)
This will be output of above code:

Here we are
Scaffold(
  drawer: Drawer(
      elevation: 20.0,
      child: ListView(
        padding: EdgeInsets.zero,
        children: <Widget>[
          UserAccountsDrawerHeader(
            accountName: Text('Hammad Tariq'),
            accountEmail: Text('[email protected]'),
            currentAccountPicture:
                Image.network('https://hammad-tariq.com/img/profile.png'),
            decoration: BoxDecoration(color: Colors.blueAccent),
          ),

 // Drawer layout first item.
          ListTile(
            leading: Icon(Icons.account_circle),
            title: Text('Drawer layout Item 1'),
            onTap: () {
              // This line code will close drawer programatically....
               Navigator.pop(context);
            },
          ),
          Divider(
            height: 2.0,
          ),
        ],
      )),
)

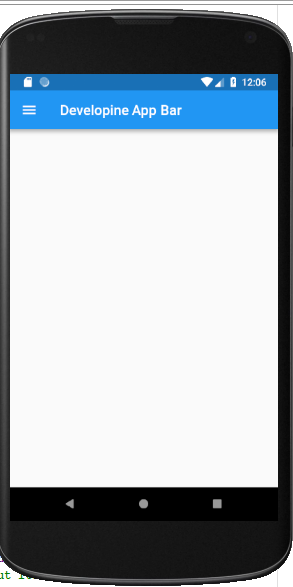
Simply add appBar using AppBar Widget and Flutter will make it like Toolbar and will also show hamburger icon.
If you want to center Appbar title use this property inside AppBar widget.
appBar: AppBar(
  centerTitle: true,
  title: Text('Developine App Bar'),
)
Hamburger icon is displayed by default because we have not provided any leading widget inside AppBar.
As our Scaffold widget has AppBar widget and our Drawer is inside AppBar so Flutter will place side menu icon (hamburger icon) automatically which will be used to open drawer.
If there is no drawer widget inside AppBar, Flutter will add back arrow here. which will be used to go back to screen or close app.
import 'package:flutter/material.dart';

void main() => runApp(new MyApp());

class MyApp extends StatelessWidget {
  // This widget is the root of your application.
@override
  Widget build(BuildContext context) {
    return new MaterialApp(
      title: 'Flutter Drawer Layout Demo',
      debugShowCheckedModeBanner: false,
      theme: new ThemeData(
        primarySwatch: Colors.blue,
      ),
      home: new MyHomePage(title: 'Flutter Drawer Demo Home Page'),
    );
  }
}

class MyHomePage extends StatelessWidget {
  MyHomePage({Key key, this.title}) : super(key: key);

  final String title;

  @override
  Widget build(BuildContext context) {
    return Container(
        child: new Scaffold(
        appBar: AppBar(
        title: Text('Developine App Bar'),
        )
          drawer: Drawer(
              elevation: 20.0,
              child: ListView(
                padding: EdgeInsets.zero,
                children: <Widget>[
                  UserAccountsDrawerHeader(
                    accountName: Text('Hammad Tariq'),
                    accountEmail: Text('[email protected]'),
                    currentAccountPicture:
                    Image.network('https://hammad-tariq.com/img/profile.png'),
                    decoration: BoxDecoration(color: Colors.blueAccent),
                  ),
                  ListTile(
                    leading: Icon(Icons.account_circle),
                    title: Text('Drawer layout Item 1'),
                    onTap: () {
                      // This line code will close drawer programatically....
Navigator.pop(context);
                    },
                  ),
                  Divider(
                    height: 2.0,
                  ),
                  ListTile(
                    leading: Icon(Icons.accessibility),
                    title: Text('Drawer layout Item 2'),
                    onTap: () {
                      Navigator.pop(context);
                    },
                  ),
                  Divider(
                    height: 2.0,
                  ),
                  ListTile(
                    leading: Icon(Icons.account_box),
                    title: Text('Drawer layout Item 3'),
                    onTap: () {
                      Navigator.pop(context);
                    },
                  )
                ],
              )),
        ));
  }
}
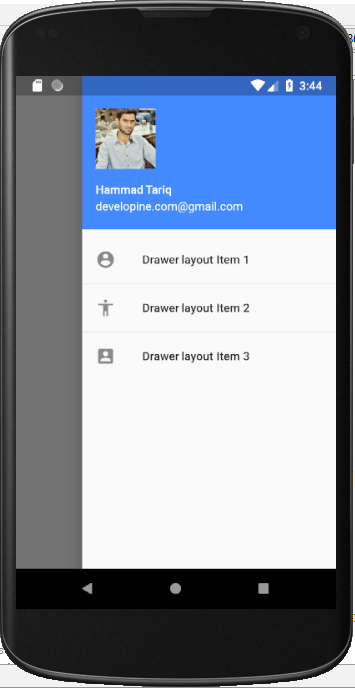
If you want to open drawer from right side of app like below:

This code has slight change than above code.
Above code is using drawer property of Scaffold Widget, whereas below code will be using endDrawer property of Scaffold Widget.
import 'package:flutter/material.dart';

void main() => runApp(new MyApp());

class MyApp extends StatelessWidget {
  // This widget is the root of your application.
@override
  Widget build(BuildContext context) {
    return new MaterialApp(
      title: 'Flutter Drawer Layout Demo',
      debugShowCheckedModeBanner: false,
      theme: new ThemeData(
        primarySwatch: Colors.blue,
      ),
      home: new MyHomePage(title: 'Flutter Drawer Demo Home Page'),
    );
  }
}

class MyHomePage extends StatelessWidget {
  MyHomePage({Key key, this.title}) : super(key: key);

  final String title;

  @override
  Widget build(BuildContext context) {
    return Container(
        child: new Scaffold(
        appBar: AppBar(
        title: Text('Developine App Bar'),
        )
      endDrawer: Drawer(
          elevation: 20.0,
          child: ListView(
            padding: EdgeInsets.zero,
            children: <Widget>[
              UserAccountsDrawerHeader(
                accountName: Text('Hammad Tariq'),
                accountEmail: Text('[email protected]'),
                currentAccountPicture:
                    Image.network('https://hammad-tariq.com/img/profile.png'),
                decoration: BoxDecoration(color: Colors.blueAccent),
              ),
              ListTile(
                leading: Icon(Icons.account_circle),
                title: Text('Drawer layout Item 1'),
                onTap: () {
                  // This line code will close drawer programatically....
Navigator.pop(context);
                },
              ),
              Divider(
                height: 2.0,
              ),
              ListTile(
                leading: Icon(Icons.accessibility),
                title: Text('Drawer layout Item 2'),
                onTap: () {
                  Navigator.pop(context);
                },
              ),
              Divider(
                height: 2.0,
              ),
              ListTile(
                leading: Icon(Icons.account_box),
                title: Text('Drawer layout Item 3'),
                onTap: () {
                  Navigator.pop(context);
                },
              )
            ],
          )),
    ));
  }
}
copyright : http://developine.com/