Google Fit for Android is part of Google Play services.
Google Fit SDK consists of History API, Sensors API, Recording API, Sessions API and Bluetooth Low energy API.
At this point, you might be wondering ‘what is an api?’. Follow the link for an in-depth explanation, but it is a software that allows two separate applications to work together. Google Fit API in Android provides all the features available in Google Fit official Android app.
This article will cover how to connect with Google Fit API and how to record user health data
using History API in Google fit SDK for Android.
This tutorial focuses on saving distance, calories burned, start time, end time of a user activity using Google Fit History API.
We will learn how to use Google play services Android sdk and store user data in Google Fitness API
for later use.
Fitness data stored using Fitness API can be accessed from any device whether it be Android Wear, iOS or web app.
Google Fit API for Android required OAuth2.0 id.
I assume you have created a project at Google console and you are done with Oauth2.0 part also.
Make sure Google Play services and Google Repository packages are installed in Android SDK.
Add Google Fitness and Google Auth dependencies in build.gradle file.
 implementation 'com.google.android.gms:play-services-fitness:11.6.0'
implementation 'com.google.android.gms:play-services-auth:11.6.0'Before you can use Google Fit API methods you need to connect with Google Fit .
You need to provide Data Types and Scope before accessing Google Fit API.
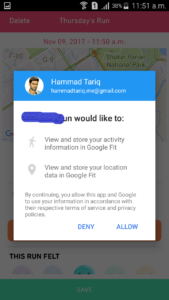
Than Google Fit will ask user to allow access to your application to read/write your fitness data from your account.
int GOOGLE_FIT_PERMISSIONS_REQUEST_CODE = 0533;
 private void buildFitnessClient() {

     FitnessOptions fitnessOptions = FitnessOptions.builder()
             .addDataType(DataType.TYPE_LOCATION_SAMPLE, FitnessOptions.ACCESS_WRITE)
             .addDataType(DataType.TYPE_ACTIVITY_SEGMENT, FitnessOptions.ACCESS_WRITE)
             .build();

     Scope scopeLocation = new Scope(Scopes.FITNESS_LOCATION_READ_WRITE);
     Scope scopesActivity = new Scope(Scopes.FITNESS_ACTIVITY_READ_WRITE);


     if (!GoogleSignIn.hasPermissions(GoogleSignIn.getLastSignedInAccount(this), fitnessOptions)) {
         GoogleSignIn.requestPermissions(
                 this, // your activity
                 GOOGLE_FIT_PERMISSIONS_REQUEST_CODE,
                 GoogleSignIn.getLastSignedInAccount(this),
                 scopesActivity, scopeLocation);
     } else {
         accessGoogleFit();
     }
 }
Because we need to save distance travelled, calories burned data so we need FITNESS_ACTIVITY_READ_WRITE and FITNESS_LOCATION_READ_WRITE permissions from user.
At this step user will see following screen.

Now add onActivityResult override method to handle user response to your requst. If user grant permission to your application for accessing Google Fit data or not this will be called.
@Override
 protected void onActivityResult(int requestCode, int resultCode, Intent data) {
     if (resultCode == Activity.RESULT_OK) {
         if (requestCode == GOOGLE_FIT_PERMISSIONS_REQUEST_CODE) {
             accessGoogleFit();
         }
     }
 }
If user granted access to your application. You can now connect with Google Fit. Now assuming user has authorized access to read write Fitness History data. We will build GoogleApiClient for saving fitness data.
 private void accessGoogleFit() {
     Log.d(LogTheRunActivity.this.getLocalClassName(), "authorized");

     if (mFitnessClient == null) {
         mFitnessClient = new GoogleApiClient.Builder(this)
                 .addApi(Fitness.SESSIONS_API)
                 .addApi(Fitness.HISTORY_API)
                 .addScope(new Scope(Scopes.FITNESS_LOCATION_READ_WRITE))
                 .addScope(new Scope(Scopes.FITNESS_ACTIVITY_READ_WRITE))
                 .addConnectionCallbacks(
                         new GoogleApiClient.ConnectionCallbacks() {
                             @Override
                             public void onConnected(Bundle bundle) {
                                 Log.i(LogTheRunActivity.this.getLocalClassName(), "Fitness Connected!!!");
                                 // Now you can make calls to the Fitness APIs.
                                 addUserDataAndroidHealth();
                             }

                             @Override
                             public void onConnectionSuspended(int i) {
                                 // If your connection to the sensor gets lost at some point,
                                 // you'll be able to determine the reason and react to it here.
                                 if (i == GoogleApiClient.ConnectionCallbacks.CA-- USE_NETWORK_LOST) {
                                     Log.i(LogTheRunActivity.this.getLocalClassName(), "Connection lost.  Cause: Network Lost.");
                                 } else if (i == GoogleApiClient.ConnectionCallbacks.CA-- USE_SERVICE_DISCONNECTED) {
                                     Log.i(LogTheRunActivity.this.getLocalClassName(),
                                             "Connection lost.  Reason: Service Disconnected");
                                 }
                             }
                         }
                 )
                 .enableAutoManage(this, 0, new GoogleApiClient.OnConnectionFailedListener() {
                     @Override
                     public void onConnectionFailed(ConnectionResult result) {
                         Log.i(LogTheRunActivity.this.getLocalClassName(), "Google Play services connection failed. Cause: " +
                                 result.toString());
                         Snackbar.make(
                                 txtRunName,
                                 "Exception while connecting to Google Play services: " +
                                         result.getErrorMessage(),
                                 Snackbar.LENGTH_INDEFINITE).show();
                     }
                 })
                 .build();
     }
 }
Now we have to save user activity start time, end time, calories burned and distance covered we will use below code.
This is the case when user has runned and your application needs to save run details in Google Fit API.
 private final String SESSION_NAME = "LogRunActivity";
 SessionInsertRequest insertRequest;
 private void addUserDataAndroidHealth() {
    mSession = new Session.Builder()
             .setName(SESSION_NAME)
             .setIdentifier(getString(R.string.app_name) + " " + System.currentTimeMillis())
             .setDescription("Running Session Details")
             .setStartTime((long) startTime, TimeUnit.MILLISECONDS)
             .setEndTime((long) endTime, TimeUnit.MILLISECONDS)
             .setActivity(FitnessActivities.RUNNING)
             .build();
     DataSource distanceSegmentDataSource = new DataSource.Builder()
             .setAppPackageName(this.getPackageName())
             .setDataType(DataType.AGGREGATE_DISTANCE_DELTA)
             .setName("Total Distance Covered")
             .setType(DataSource.TYPE_RAW)
             .build();
     DataSet distanceDataSet = DataSet.create(distanceSegmentDataSource);
     DataPoint firstRunSpeedDataPoint = distanceDataSet.createDataPoint()
             .setTimeInterval((long) startTime, (long) endTime, TimeUnit.MILLISECONDS);
     firstRunSpeedDataPoint.getValue(Field.FIELD_DISTANCE).setFloat((float) totalCoveredDistanceInMiles);
     distanceDataSet.add(firstRunSpeedDataPoint);
     DataSource caloriesDataSource = new DataSource.Builder()
             .setAppPackageName(this.getPackageName())
             .setDataType(DataType.AGGREGATE_CALORIES_EXPENDED)
             .setName("Total Calories Burned")
             .setType(DataSource.TYPE_RAW)
             .build();
     DataSet caloriesDataSet = DataSet.create(caloriesDataSource);
     DataPoint caloriesDataPoint = caloriesDataSet.createDataPoint()
             .setTimeInterval((long) startTime, (long) endTime, TimeUnit.MILLISECONDS);
     caloriesDataPoint.getValue(Field.FIELD_CALORIES).setFloat((float) totalCalories);
     caloriesDataSet.add(caloriesDataPoint);
     insertRequest = new SessionInsertRequest.Builder()
             .setSession(mSession)
             .addDataSet(distanceDataSet)
             .addDataSet(caloriesDataSet)
             .build();
     new InsertIUserHistoryDataGoogleFit().execute("", "", "");
 }
As Google Fit API will execute a network call for writing user data to Fitness History API. We will not call this code on main thread instead we will write Async Task.
 private class InsertIUserHistoryDataGoogleFit extends AsyncTask<String, Integer, String> {
     protected String doInBackground(String... urls) {
         pendingResult =
                 Fitness.SessionsApi.insertSession(mFitnessClient, insertRequest);

         pendingResult.setResultCallback(new ResultCallback() {
             @Override
             public void onResult(com.google.android.gms.common.api.Status status) {
                 insertStatus = status;
                 if (status.isSuccess()) {           // -- USER RECORD INSERTED SUCCESSFULLY.
                                   } else {
                     Log.i(LogTheRunActivity.this.getLocalClassName(), "Failed to insert running session: " + status.getStatusMessage());
                 }
             }
         });
         return "";
     }
     protected void onProgressUpdate(Integer... progress) {
     }
     protected void onPostExecute(String result) {
     }
 }