In this tutorial I will explain how you can integrate Firebase Push Notification SDK in your Android Application and how to send push notification from Firebase console and from Application Server to your Android Application.
Create project in firebase console FireBase console Link . Your project ID while creating project will be applicationId in build.gradle.
Download google-service.json file and place it in app folder of your Android project.
Now setup Firebase SDK in Android project.
Updated 30 Oct 2018
Add this dependency in module build.gradle file
implementation 'com.google.firebase:firebase-messaging:17.3.3'
Add this at bottom of module build.gradle file.
apply plugin: ‘com.google.gms.google-services’
Add this in project build.gradle file
classpath ‘com.google.gms:google-services:4.1.0’
If you are still using Java please go down and find Java Code.
Create a new package ‘firebase’ in your project.
We will create a new Firebase Messaging Class in this package.
First of all declare Messaging Service class in Manifest file.
<service android:name=".firebase.MyFirebaseMessagingService">
<intent-filter>
<action android:name="com.google.firebase.MESSAGING_EVENT" />
</intent-filter>
</service>
This classs is responsible for generating new firebase refresh token.
You will get token callback inside onNewToken function.
// MyFirebaseMessagingService.kt

class MyFirebaseMessagingService : FirebaseMessagingService() {

    override fun onNewToken(p0: String?) {
        super.onNewToken(p0)
        mSharedPreference!![SharedPrefFlag.fcmToken] = p0
    }

    override fun onMessageReceived(remoteMessage: RemoteMessage?) {
        super.onMessageReceived(remoteMessage)

        Log.d(MewConstants.mewLogs, "notification received: " + remoteMessage)

        createNotificationChannel()

        var notificationData   = remoteMessage?.data

        val title =notificationData?.get("title")
        val message =notificationData?.get("message")

        // Create an explicit intent for an Activity in your app
        val intent = Intent(this, SplashActivity::class.java).apply {
            flags = Intent.FLAG_ACTIVITY_NEW_TASK or Intent.FLAG_ACTIVITY_CLEAR_TASK
            putExtra("isFromFCMNotification", true)
        }

        val pendingIntent: PendingIntent = PendingIntent.getActivity(this, 0, intent, 0)
        val mBuilder = NotificationCompat.Builder(this, "default")
                .setSmallIcon(R.mipmap.ic_launcher)
                .setContentTitle(title)
                .setContentText(message)
                .setPriority(NotificationCompat.PRIORITY_MAX)
                .setDefaults(NotificationCompat.DEFAULT_ALL)
                // Set the intent that will fire when the user taps the notification
                .setContentIntent(pendingIntent)
                .setAutoCancel(true)

        with(NotificationManagerCompat.from(this)) {
            // notificationId is a unique int for each notification that you must define
            notify(1000, mBuilder.build())
        }
    }

    private fun createNotificationChannel() {
        // Create the NotificationChannel, but only on API 26+ because
        // the NotificationChannel class is new and not in the support library
        if (Build.VERSION.SDK_INT >= Build.VERSION_CODES.O) {
            val name = "DEVELOPINE_NOTIFICATION"
            val descriptionText = "DEVELOPINE_NOTIFICATION_DETAIL"
            val importance = NotificationManager.IMPORTANCE_HIGH

            val channel = NotificationChannel("default", name, importance).apply {
                description = descriptionText
                setShowBadge(true)
            }
            // Register the channel with the system
            val notificationManager: NotificationManager =
                    getSystemService(Context.NOTIFICATION_SERVICE) as NotificationManager
            notificationManager.createNotificationChannel(channel)
        }
    }
}
Declare the service classes in manifest file. we will just create two classes. MyFirebaseInstanceIDService classs will extend FirebaseInstanceIdService which will be responsible for handling Firebase token. Here you will get token which will be used to send notification to a single device.
And second service class MyFirebaseMessagingService will extend FirebaseMessagingService.
Here you will receive and handle Firebase Push Notifications.
<service
 android:name=”.MyFirebaseMessagingService”
 android:enabled=”true”
 android:exported=”true”>
 <intent-filter>
 <action android:name=”com.google.firebase.MESSAGING_EVENT” />
 </intent-filter>
 </service>
<service android:name=”.MyFirebaseInstanceIDService”>
 <intent-filter>
 <action android:name=”com.google.firebase.INSTANCE_ID_EVENT” />
 </intent-filter>
 </service>
4. Add above declared service classes.
public class MyFirebaseInstanceIDService extends FirebaseInstanceIdService {
 public MyFirebaseInstanceIDService() {
 }
 @Override
 public void onTokenRefresh() {
 // Get updated InstanceID token.
 String refreshedToken = FirebaseInstanceId.getInstance().getToken();
 Log.d(“firebase”, “Refreshed token: “ + refreshedToken);

// We will Send this refreshedToken to our app server, so app
 // server can save it
 // and can later use it for sending notification to app.

// sendRegistrationToServer(refreshedToken);
 }
 }
And

public class MyFirebaseMessagingService extends FirebaseMessagingService {
 public MyFirebaseMessagingService() {
 }
 @Override
 public void onMessageReceived(RemoteMessage remoteMessage) {
 super.onMessageReceived(remoteMessage);

Log.d(“firebase”, “From: “ + remoteMessage.getFrom());
 Log.d(“firebase”, “Notification Message Body: “ +
 remoteMessage.getNotification().getBody());

}
}
Till now we have used official source code from Firebase which you may have seen at Firebase website or already added. Next is the actual thing.
Now we are done with adding Firebase in Android Application.
Now you can login to Firebase console and can send push notification
If you want to send push notification from your app server.
http://developine.com/how-to-send-firebase-push-notifications-from-app-server-tutorial/
Go to Firebase project → Project Settings → Cloud Messaging and copy your firebase project key. we will use this project key for sending push notification from app server or from rest client.
I will use Rest Client for demo purpose.
URL : https://fcm.googleapis.com/fcm/send
HEADER: Authorization:key=AIzaSyD_Vw3Zf8XXXSDMSDKLMGyqR_Kyw5o
PARAMS: Mentioned in image below.
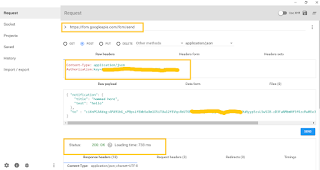
If you are getting internal server error(500) or unauthorized(401) than your server key is incorrect.
See I sent push notification to my device using rest client. Now you can develop your REST API accordingly for this purpose.
Note: I have not added sending Firebase token to your app server.
Something more about Sending Notification from Firebase.
If you don’t want to use default Application icon for Notification and default Notification sound you can customize Notification icon and Notification sound using below code
{

“to” : “bk3RNwTe3H0:CI2k_HHwgIpoDKCIZvvDMExUdFQ3P1…”,

“notification” : {

“body” : “great match!”,

“title” : “Portugal vs. Denmark”,

“icon” : “myicon”,

“sound” : “mySound”

}

}
icon should be in your app drawable folder. and mysound file should be in raw folder.
We have customized notification icon and notification sound. but still firebase is managing it at backend. onMessageReceived method is not called and we have not processed notification.
If you want onMessageReceived to be called when notification is received from firebase. Than there is another thing which you need to understand.
From official Firebase docs
For downstream messaging, FCM provides two types of payload: notification payload and data payload.
For notification type FCM automatically displays the message to end-user devices on behalf of the client app. Notifications have a predefined set of user-visible keys.
For data type, client app is responsible for processing data messages. Data messages have only custom key-value pairs (JSON Object) .
So if you want to receive and process push notification in your Android app You need to send data payload.
This is how to send data payload for push notification.
{ “data”: {
 “title”: “Firebase notification”,
 “detail”: “I am firebase notification. you can customise me. enjoy”,
 },
 “to” : “efaOvIXDbik:APA91bEkNUVWNaoA….”
 }
Now Firebase server will not send push notification to OS for handling and displaying push notification in notification tray.
It will leave it for client/developer to receive and handle notification.
Overridden method onMessageReceived will be called and developer can handle it.
This blog post can answer following questions.
If you want to send push notification to a single user from app server you need Firebase token of that user.
Firebase SDK is responsible to generate that token. You can save token to your app server.
If you want to send Firebase push notification from your app server to all users. you can send notification to topics.
Users can subscribe to topics.
Link for more details on How to send push notification from app server.